

How to Get a Class 3 Digital Signature Certificate for eTender in India: A Complete Guide
Introduction
Digital Signature Certificate for eTender: In the era of Digital India, participating in government contracts has shifted from physical paperwork to sophisticated eTender and eProcurement portals. However, the most common roadblock for contractors and businesses is the Digital Signature Certificate (DSC).
If you are planning to bid for any government project, having a valid Class 3 DSC is not just a choice—it’s a legal mandate. In this comprehensive guide, we will break down everything you need to know about DSC for tenders, from application to troubleshooting.
Why is a Digital Signature Certificate (DSC) Mandatory for eTendering?
Government tenders involve high-value contracts and sensitive data. To maintain the integrity of the bidding process, the Information Technology Act, 2000 mandates the use of DSCs to ensure:
- Unmatched Security: Your documents are encrypted and safe from unauthorized access.
- Identity Verification: It confirms that the person/company bidding is authentic.
- Non-Repudiation: Once a bid is signed digitally, the bidder cannot deny their participation.
- Data Integrity: It ensures that no one can tamper with your bid documents after submission.
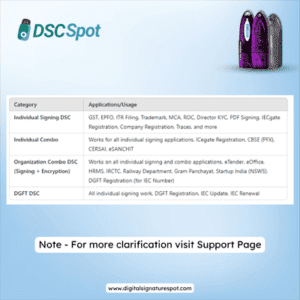
Which Type of DSC is Required for eTender?
Not all DSCs are created equal. For eTender and eProcurement portals (like CPP Portal, Railway, PWD, or NHAI), you specifically need:
1. Class 3 Digital Signature (Mandatory)
This is the highest level of security. Class 2 DSCs have been discontinued by the CCA (Controller of Certifying Authorities), so Class 3 is now the universal standard.
2. Signing & Encryption (Combo)
Most tender portals require a Combo Certificate which includes:
- Signing: To sign the tender documents.
- Encryption: To encrypt the price bid (BoQ) so no one can see your rates until the tender opens.
3. Individual vs. Organization DSC
- Individual DSC: Used by sole proprietors or individual contractors.
- Organization DSC: Used by Companies, LLPs, or Partnership firms. (Recommended for most tenders).
How to Apply for Class 3 Digital Signature Certificate for eTender in India (Step-by-Step)

The modern Digital Signature application is a 100% paperless and encrypted process. Thanks to the latest eKYC guidelines, you no longer need to courier physical documents. You can complete the entire process from your home or office in under minutes.
Follow these detailed steps to secure your Class 3 DSC for eTendering:
Step 1: Select the Correct Category & Validity
Before starting, identify the specific requirement of the tender portal you are using:
- Class 3 Individual: Ideal for sole proprietors or individual consultants.
- Class 3 Organization: Mandatory for Companies, LLPs, Partnership Firms, and NGOs. This category requires proof of the organization’s existence (like a GST certificate or Incorporation core).
- Validity Options: You can choose between 1, 2, or 3 years. We recommend 2 years for the best value.
Step 2: Choose Your eKYC Verification Mode
To verify your identity, you have two highly secure digital options:
- Aadhaar-based eKYC (Recommended): If your mobile number is linked to your Aadhaar, this is the fastest method. You simply enter your Aadhaar number and verify via OTP. No document scanning is required.
- PAN-based eKYC: If your Aadhaar is not linked to a mobile number, you can use your PAN card. You will need to upload a scanned copy of your PAN and one address proof (like a Voter ID, Passport, or Driving License).
Step 3: Complete a 20-Second Video Verification
To prevent identity theft, a live video recording is mandatory by the Certifying Authority (CA):
- You will receive a secure link on your mobile or email.
- In the video, you must clearly state your Name and a 3-digit code displayed on the screen.
- You will also need to show your original PAN card and Address Proof to the camera.
- Tip: Ensure you are in a well-lit room with a stable internet connection.
Step 4: Secure Online Payment
Once the verification data is submitted, proceed to the secure payment gateway. You can pay via UPI, Credit/Debit Cards, or Net Banking. Upon successful payment, your application is automatically pushed to the Certifying Authority (CA) for final approval.
Step 5: Final CA Approval (15-30 Minutes)
The Certifying Authority reviews your video and eKYC data.
- If everything matches, your DSC is approved within 15 to 30 minutes.
- You will receive a confirmation SMS and Email containing your Certificate Serial Number and a link to download the DSC.
Step 6: Downloading the Certificate into a USB Token
This is the final technical step. Your Digital Signature must be stored on a FIPS-certified hardware device (USB Token) like HYP2003, mToken, or Proxkey.
- Insert the USB Token into your PC/Laptop.
- Install the Token Driver (usually found inside the ‘My Computer’ drive of the token).
- Run the Download Utility: Use the official utility tool from the CA website.
- Input eKYC PIN: Enter the PIN you created during the application.
- Successful Download: Once the download is complete, your DSC is ready to be used on any eTender portal.
Need Help with Installation?
Setting up drivers and browser settings for the first time can be tricky. At Digital Signature Spot, we don’t just provide the certificate—we provide complete remote installation support to ensure your token works perfectly on the first try.
💡 Pro Tip: Always buy a new USB Token if you don’t have one, as DSCs cannot be downloaded on a regular flash drive.
Troubleshooting: Common DSC Errors & Solutions
Even with a valid DSC, you might face technical glitches. Here’s how to fix them:
| Error | Possible Reason | Quick Solution |
| DSC Not Detected | Missing drivers or loose connection. | Re-insert token & install the latest driver from “My Computer”. |
| emSigner Error | emSigner service is not running. | Search for ’emSigner’ in your Windows Start menu and ‘Run as Administrator’. |
| Certificate Not Showing | Browser compatibility issues. | Use the latest version of Chrome or Edge. Ensure Java is updated. |
| Invalid Signature | DSC has expired. | Check validity. If expired, apply for DSC Renewal. |
Expert Tips for a Smooth eTender Submission
- Check Validity: Always check your DSC expiry date at least 7 days before the tender deadline.
- Driver Installation: Every USB token has a built-in driver. Install it before logging into the portal.
- Java Settings: Ensure the tender portal URL is added to the “Exception Site List” in your Java Control Panel.
- Don’t Wait for the Last Minute: Portal traffic and DSC errors can cause delays. Submit your bid at least 24 hours early.
Need Help with Your DSC?
At Digital Signature Spot, we simplify the technicalities for you. Whether you need a fresh Class 3 DSC or a quick renewal, our experts provide end-to-end support.
Our Services Include:
- ✅ Class 3 DSC Issuance
- ✅ Paperless Renewal
- ✅ USB Token Configuration & Driver Support
- ✅ Remote assistance for Tender Portal Login
🔗 Apply Now: Digital Signature Certificate Online
📞 Call / WhatsApp: +91-7579984381
Frequently Asked Questions (FAQ)
Q1. Is Class 2 DSC valid for tenders?
No, Class 2 has been discontinued. Only Class 3 DSC is valid for all government eTender portals in India.
Q2. Can I use the same DSC for different portals?
Yes, a single Class 3 Organization DSC can be used for the CPP Portal, GeM, Income Tax, GST, and various state eProcurement sites.
Q3. What is a USB Token in DSC?
A USB Token is a password-protected hardware device that stores your digital signature securely. It ensures your signature cannot be copied or stolen.
Q4. How long does it take to get a DSC?
If your documents and video verification are ready, we can issue your DSC in 15 to 30 minutes.
About the Author:
Samarth is a leading Digital Signature expert and the founder of Digital Signature Spot. With years of experience in eTendering technicalities, he has helped thousands of contractors navigate the complexities of digital certificates and government portals.


Add comment