How to Apply Aadhaar Based DSC (Digital Signature) in Prodigisign CA 2025 Guide
A Complete Step-by-Step Process to Apply Paperless DSC Online
Introduction
How to Apply Aadhaar Based DSC (Digital Signature) in Prodigisign CA 2025 Guide: In today’s digital-first world, submitting and signing documents physically is not only time-consuming but also outdated. That’s where Digital Signature Certificates (DSC) come in — especially Aadhaar-based DSC, which allows you to complete the entire application process online, instantly, and without any physical paperwork.

In this blog, you’ll learn how to apply Aadhaar-based DSC through the ProdigiSign CA portal, using the Aadhaar Offline XML method — considered the most secure and fastest way to get your DSC issued.
Let’s begin.
What is Aadhaar-Based DSC?
Aadhaar-based DSC is a type of Class 3 digital signature certificate, where your identity is verified via eKYC using your Aadhaar number. Instead of submitting scanned documents and signatures, the system uses OTP authentication + XML file issued by UIDAI.
This process is:
- ✅ 100% Paperless
- ✅ Government Approved
- ✅ Legally Valid under the IT Act, 2000
- ✅ Accepted across all Indian government portals
Why Choose Aadhaar-Based DSC?
| Benefit | Description |
|---|---|
| 🔐 Legal Validity | Recognized under Indian cyber law |
| 📲 Instant Processing | Issue within 10–30 mins |
| 📁 No Documents | No PAN, photo, or signature upload needed |
| 🛡️ Secure XML | UIDAI-signed file, tamper-proof |
| 🔄 Reusable Process | Easy renewal & future applications |
📋 Eligibility & Requirements
To apply Aadhaar-based DSC via ProdigiSign CA, ensure:
- Aadhaar number is linked with mobile
- You have access to that mobile number
- Basic internet and browser access
- USB Token (optional, for certificate download)
Step-by-Step Guide to Apply Aadhaar-Based DSC via ProdigiSign
Now let’s break down the full process in detail:
🔹 Step 1: Login to Your RA Panel
- Visit the RA login panel of ProdigiSign CA
- Go to the “Apply DSC” section
- Click on “Buy DSC” to start a new request
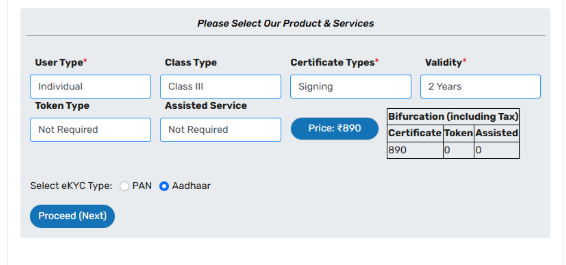
🔹 Step 2: Select Product and eKYC Type
- Choose your required DSC plan (Class 3 Signing or Sign + Encrypt)
- Select validity (1 year or 2 years)
- Under eKYC Type, select “Aadhaar”
🔹 Step 3: Mobile Verification (OTP)
- Enter your Aadhaar-registered mobile number
- Click on “Get OTP”
- Enter the OTP received on your phone
- Click on “Verify”
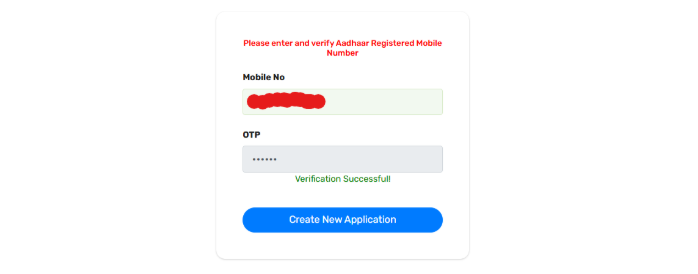
💡 Tip: Make sure the mobile number is the same as linked with Aadhaar, or the OTP won’t be delivered.
🔹 Step 4: Create New DSC Application
- After OTP verification, click “Create New Application”
- On the next screen, choose “Aadhaar Offline” as the eKYC method

🔹 Step 5: Download Aadhaar XML from UIDAI Portal
- Click on the “Click Here” button (on ProdigiSign portal)
→ This will redirect you to UIDAI’s official website - On UIDAI site:
- Click “Login”
- Enter your Aadhaar number and Captcha
- Click on Send OTP
- Enter the OTP received and click Login
- After logging in:
- Find and click on “Offline eKYC”
- Enter a Share Code (e.g.
1234) - This code will be required again — note it down carefully
- Click on Download
- This will generate an XML file (contains your Aadhaar info, digitally signed)
📝 Note: The XML file is valid for only 72 hours. Use it quickly after download.
🔹 Step 6: Upload XML and Enter Share Code
- Return to the RA portal
- Upload the Aadhaar XML file
- Enter the same Share Code
- Click “Proceed”
🔹 Step 7: Fill in Remaining Details
Now a pre-filled form will appear with your Aadhaar data:
- ✅ Name
- ✅ Address
- ✅ Date of Birth etc
You only need to fill:

- Your PAN number (if applicable)
- Email ID → Click on “Send OTP” and verify it
🔹 Step 8: Enter BP Code (Optional)
- If you are an RA user, BP Code – PRO40548
- If not, leave it blank or use your DSC provider’s BP code
❗ If unsure, ask your DSC service provider for the correct BP code to use
🔹 Step 9: Select Payment Option
Now you will see two payment options:
- Proceed and Pay Now – Complete payment immediately
- Proceed and Pay Later – Skip payment for now (you’ll still get a PID)
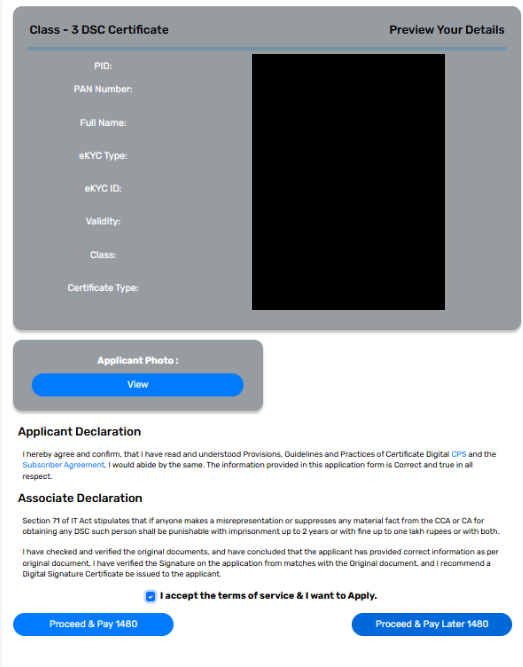
💡 Choosing “Pay Later” still creates your DSC request. You can continue with the next steps and pay after verification if needed.
🔹 Step 10: Receive PID Number
Once you click “Proceed”, a PID number (Product ID) is generated. This means:
- Your application is created
- Aadhaar XML has been accepted
- You can now proceed to Video Verification
🔍 What is the Next Step After Application?
After receiving the PID, the next step is:
Once you have successfully applied for your Aadhaar-based DSC in ProdigiSign CA, the next important step is video verification. This step ensures your identity verification as per DSC guidelines. Follow the steps below:
- Open the Video Verification Link
Visit: https://apply.prodigisign.pro/DscRegistration/UserTrackDSCStatus - Enter Your PID Number
Use the PID number you received after submitting your application. - Verify with OTP
An OTP will be sent to your registered mobile number. Enter it to proceed. - Access Your DSC Details
Once logged in, your DSC application details will be displayed. Look for the option “Record Video” and click on it. - Start the Camera
- Click Start Camera
- Allow all permissions for camera and microphone access.
- Record Your Video
- Click Start Recording.
- Read the verification script clearly and completely.
- Ensure you are in a well-lit environment, and your face is clearly visible.
- Review & Submit
- After recording, review your video.
- If everything is clear and correct, click Submit.
- Approval Process
ProdigiSign CA will review your video. If all details match and the video is correct, your DSC will be approved within a short time.
💡 Pro Tip: Make sure your internet connection is stable during video recording to avoid errors.
💬 Common Questions (FAQs)
Q1. What is Share Code in Aadhaar XML?
It’s a 4-character password you set during XML download. It’s required during DSC application for decryption.
Q2. Can I use Aadhaar-based DSC for DGFT, GST, and ITR?
Yes, it’s fully valid for all government and regulatory portals.
Q3. What if my mobile number is not linked with Aadhaar?
Visit your nearest Aadhaar Seva Kendra to update your mobile number.
Q4. Can I apply without PAN?
For personal DSC, PAN is optional. But for organization DSC or GST-related usage, PAN may be required.
🚀 Conclusion: Fastest Way to Get Your Digital Signature
If you’re looking for a quick, paperless, and legally valid way to get your digital signature, the Aadhaar XML method through Prodigisign CA is the best option.
From application to issuance, the process can be completed in less than 30 minutes.
📌 Ready to Apply?
👉 Visit: DigitalSignatureSpot.com
✅ Trusted Partner for Aadhaar-Based DSC
✅ Full Support for Application + Verification
✅ USB Token Delivery Available


Add comment