
How to Re-download a Vsign DSC: Certificate Re-Key and Token Initialization
How to Re-download a Vsign DSC: Panic sets in when your digital signature certificate (DSC) becomes unusable. Maybe you misplaced your USB token, or perhaps you locked it after entering the wrong PIN too many times. A physical problem with the USB token itself can also render your DSC useless, even if it still has months or years of validity left.
In such a frustrating situation, what are your options? Is it possible to simply unlock the USB token and get your certificate back? The answer, as per recent guidelines, is a definitive no. Since July 1, 2023, the Certifying Authority (CCA) has completely banned USB token unlocking systems for security reasons.

Does this mean your DSC is completely lost? Absolutely not. There is a way to get a new copy of your digital signature certificate and a way to reuse your locked USB token. This comprehensive guide will walk you through the entire process, from getting a new certificate to preparing your token for reuse.
Understanding the Solution – How to Re-download a Vsign DSC What is a Certificate Re-Key?

Before we dive into the steps, it’s crucial to understand the solution.
What is a Certificate Re-Key?
A Certificate Re-Key, or reissue, is the process of generating a brand new digital signature certificate to replace a previously issued one. The new certificate is created with a different public key and serial number for security purposes. However, it holds the same characteristics and, most importantly, the same expiry date as your original certificate.
Think of it this way: you have a key to a locked box (your original DSC). You lose that key. The re-key process doesn’t find the old key; it gives you a brand new, identical key that works for the same amount of time as the old one did. This is a secure and officially recognized method for recovering your digital signature.
VSIGN CA allows a new certificate to be issued to a subscriber when the old one is compromised or lost, as long as the subscriber can meet the requirements set forth by the CCA-IVG.
The Vsign Re-Key Process – Reissuing Your Digital Certificate
This is the first and most important step. You will get a new digital certificate that can be downloaded onto a new or formatted USB token.
Step-by-Step Guide to Re-keying Your Vsign DSC:
- Visit the Official Vsign Reissue Page: Open your web browser and go to the official Vsign reissue link:
https://dsc.vsign.in/external-links/reissue - Agree to the Terms: On the page, you will see a checkbox next to a statement. Click on it to agree to the terms: “I agree, that the existing DSC will be revoked and new DSC with the same expiry date will be issued.”
- Enter Your Details: You will then be prompted to enter your Application ID and Date of Birth (the date you used when you first applied for the DSC).
- Where to find your Application ID: When you originally applied for your DSC, you would have received an SMS and an email containing your unique Application ID. Search your phone and email for messages from Vsign to find it.
- What if you can’t find the Application ID? If you have deleted the SMS or email, don’t worry. You can find your Application ID by visiting the Search DSC Status link here:
https://ca.vsign.in/loadsearchstatusdsc. Enter your PAN card details to find the application ID associated with your DSC.
- Validate with OTP: After entering your Application ID and Date of Birth, click on “Validate OTP.” A one-time password will be sent to the mobile number registered with your DSC. Enter this OTP to proceed.
- Download Your DSC: Once the OTP is validated, you will be taken to the download page. You can now download your new digital signature certificate onto a new or formatted USB token.
Watch the Complete VSign DSC Reissue Video Tutorial
If you prefer a visual walkthrough, watch our step-by-step video tutorial on the VSign DSC Reissue (Rekey) process. In this video, we demonstrate the complete procedure, including how to access the VSign Repository, validate your application using OTP, generate a new Application ID, and re-download your Digital Signature Certificate.
Whether you are a first-time DSC user or facing issues downloading your certificate again, this video will help you complete the process quickly and correctly.
Watch the Video Below:
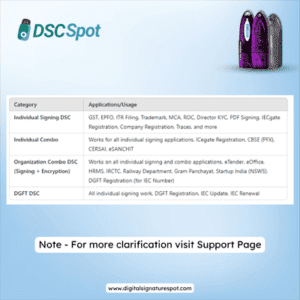
By following the instructions shown in the video, you can successfully reissue your VSign DSC and continue using it for GST filing, MCA compliance, eTendering, Income Tax filing, DGFT, ICEGATE, and other digital signing requirements.
Part 3: What to Do with the Locked USB Token?
Now that you have a new digital certificate, what about the old, locked USB token? As we mentioned earlier, unlocking it is impossible. However, you can format it so that it can be reused for your new digital signature.
What is Token Formatting (or Initialization)?
USB token formatting, or initialization, is a process that completely wipes all data and digital certificates from the device. This erases the incorrect PIN attempts and resets the token to its factory default state. After initialization, you can set a new password and download your re-keyed digital signature onto it.
Important Note: This process will permanently delete all digital certificates on the token. Make sure you don’t have any other important certificates on the token before you proceed.
The process for formatting a token varies depending on the brand. Below are step-by-step guides for the most common USB tokens.
Part 4: Step-by-Step Guides to Initializing a USB Token
How to Unlock / Initialize HYP2003 Token
- Connect the Token: First, install the HYP2003 drivers and then insert your HYP2003 USB token into your computer. Ensure it is detected by the HYP2003 Token management software.
- Open the Initialization Tool: Download the HYP2003_Initialization_Tool file. Extract the ZIP file and open the
HYP2003_Initialization_Tool.exeapplication. - Click “Initialize”: In the software interface, you will see an “Initialize” button. Click it. A warning pop-up will appear, reminding you that all data on the token will be erased.
- Confirm and Proceed: Click “Yes” to proceed. Your HYP2003 token will now be initialized.
- Set a New Password: After formatting, the default password for the HYP2003 token is “12345678“. You can now use your token management software to set a new, secure password and download your re-keyed DSC.
How to Unlock / Initialize Proxkey Token
- Insert the Token: Insert your WD Proxkey token into a working USB port on your computer.
- Install Proxkey Driver: If you haven’t already, install the Watchdata Proxkey USB Token Driver.
- Open the Driver and use the Command: Open the Proxkey Token Driver application. With the application open, press the following keyboard command:
Ctrl + Alt + W. - Click “Admin” and “Initialize Token”: After pressing the command, an “Admin” option will appear. Click on it, then click “Initialize Token.” A warning pop-up will appear. Read it carefully and click “OK“.
- Set a New Password: The Proxkey token will now be initialized. The default password for the formatted token will be “123456“. You can now download your new DSC onto it after setting a new password.
How to Unlock / Initialize mToken
- Insert the Token: Plug your locked mToken into your computer’s USB port and ensure it is detected.
- Download the Initialization Tool: Download the mToken Initialization Tool from the official source.
- Extract and Open: The downloaded file will be in ZIP format. Extract the contents and locate the file named CryptoIDAInit.exe. Open this file.
- Find the Password File: Inside the extracted folder, you will also find a file named
password.txt. Open this file, copy the password, and paste it into the required field in theCryptoIDAInittool. - Click “Initialize”: Click on the “Initialize” button within the tool.
- Reinsert the Token: After the process is complete, remove the mToken from the port and plug it back in.
- Set a New Password: Your mToken is now unlocked. The default password for the initialized mToken is “12345678“. You can now set a new password and download your re-keyed DSC.
Conclusion
While the loss or locking of a digital signature certificate can be a stressful event, it is not a permanent setback. By understanding the proper process of Certificate Re-Key from a Certifying Authority like Vsign, you can easily get a new digital certificate. Furthermore, by following the correct initialization steps for your specific USB token, you can prepare your device for reuse. This guide ensures you have all the information you need to resolve your issue and continue your corporate filings without further interruption.


Add comment