
How to Apply for an Aadhaar Based DSC in SpeedSign CA: A Step by Step Complete Guide
How to Apply for an Aadhaar Based DSC in SpeedSign CA: In today’s digital world, a Digital Signature Certificate (DSC) is essential for secure online transactions, especially for tax filings, GST, and other government portals. While applying for a DSC used to be a lengthy process, the Aadhaar-based eKYC method has made it incredibly fast and completely paperless.
In this guide, we’ll walk you through the entire process of How to Apply for an Aadhaar Based DSC in SpeedSign CA using the SpeedSign Certifying Authority (CA). We’ll cover everything you need to know, from the initial requirements to the final video verification, ensuring a smooth and hassle-free experience.
Important things before you apply aadhar base dsc in SpeedSign Certifying authority
- Your PAN and Aadhaar should be linked.
- You can only use the mobile number registered with your Aadhaar card during DSC enrollment.
- You will receive an OTP on your Aadhaar-registered mobile number.
- You need an active email ID to receive an OTP.
- The applicant must be 18 years or older.
- Video verification is required.
How to Apply for an Aadhaar Based DSC in SpeedSign CA
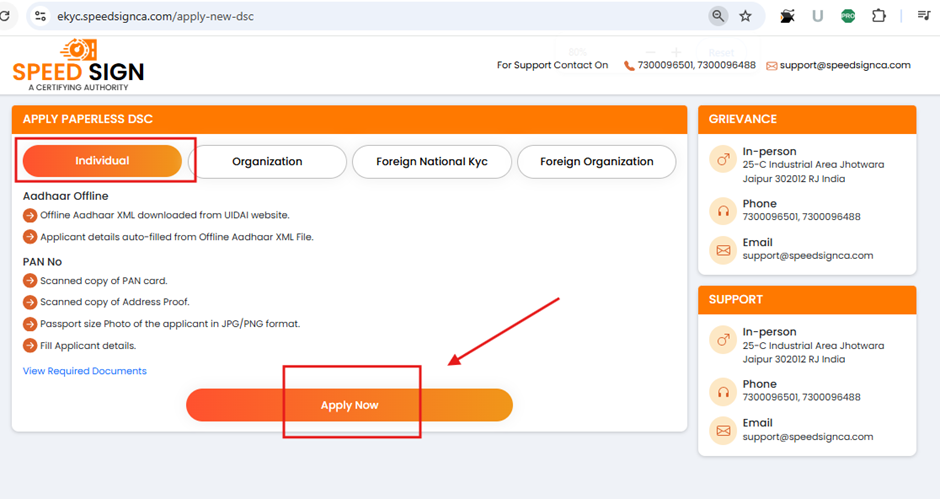
Step 1: Start Your New DSC Application
- First of all, click on the “Apply New DSC” URL:
https://ekyc.speedsignca.com/apply-new-dsc. - Next, select the “Individual” option and click on “Apply now“.
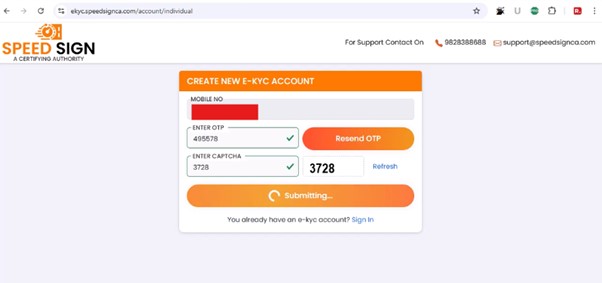
Step Two: Create a New e-KYC Account
- The “Create New e-Kyc Account” page will open. You must enter your Aadhaar-registered mobile number here. If you enter any other number, you will get an error during enrollment. So, make sure the mobile number you enter is registered with Aadhaar.
- Now, enter your mobile number and click on “Submit“. You will receive an OTP on your Aadhaar-registered mobile number. Fill in the OTP and the captcha, then click on “Continue“. You will proceed to the next step.
Step Three: Download Your Aadhaar XML File
- Now, click on “Download Aadhaar XML“, as you can see in the screenshot below.
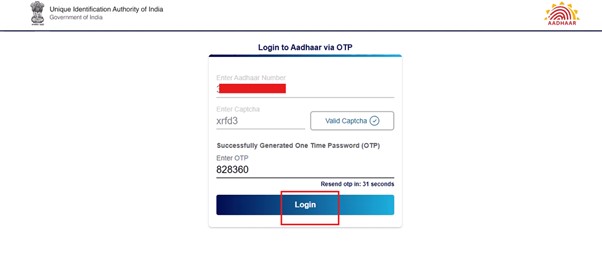
- After clicking on “Download Aadhaar XML“, you will be redirected to the Aadhaar official website’s login page. Here, you will have to enter your Aadhaar number. After entering the OTP, you will reach the Aadhaar Service page.
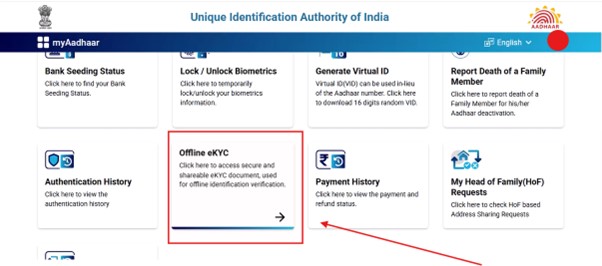
Step Four: Generate the XML File and Share Code
Once you reach the Aadhaar Service page, find the “Offline eKYC” option and click on it.
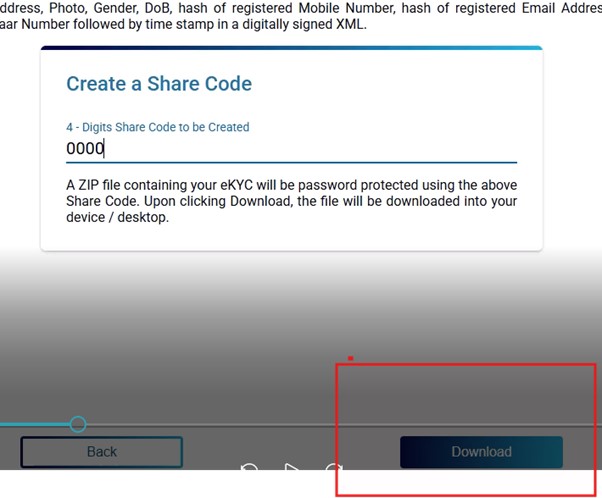
- After clicking on the “Offline eKYC” option, you will have to download the Offline XML file by entering a Share code. You can choose any code for the XML Share code, for example,
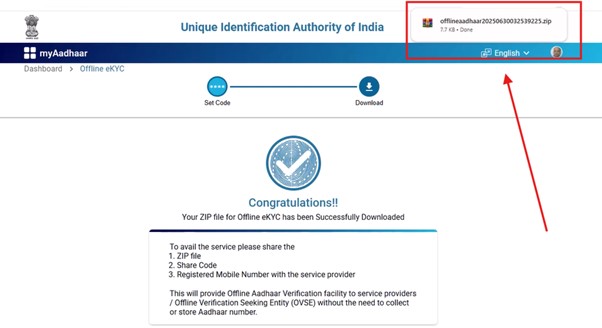
1234or0000. But remember, you will need this code later on. After entering the Share code, click on the “Download” button. You will see that a.zipfile will be downloaded to your system. Note that you do not have to extract this.zipfile.
Highlights – Get 60%+ Commission: Become a SpeedSign DSC RA Partner and Boost Your Earnings!
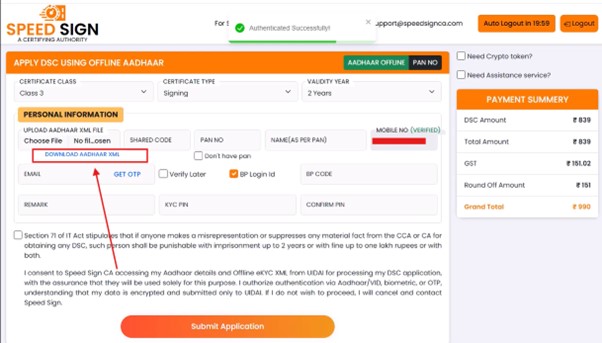
Step Five: Upload XML and Complete the Enrollment Form
- Now, you will have to come back to your DSC enrollment page and upload this XML
.zipfile. After filling in the Share code you created, all your Aadhaar details will be filled in the enrollment form. You just have to fill in your Pan Card details.
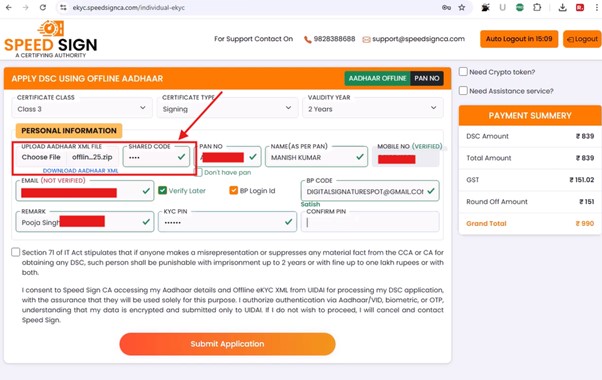
- After filling in all the details, you have to verify your email. You can also verify it later, but we recommend you verify it during enrollment itself so that your customer faces minimum hassle.
- If you are a partner of SpeedSign Certifying Authority, then you must enter your BP code. And if you are a direct customer, you can enter our BP code ID, which is
Digitalsignaturespot@gmail.com. By doing this, you will get free support for your digital signature until the DSC’s validity expires.
- Keep the eKYC PIN simple. You will need it later when you make the payment for the DSC.
- Now, click on the checkbox and then on the “Submit Application” button.
Highlights – How to do eSign Verification in SpeedSign CA, and Payment of DSC at SpeedSign Certifying Authority?
Step 6: Complete Video Verification and Payment
After that, the video verification link will open. If you are applying for your own DSC, you can record the video. If you have a SpeedSign CA Partner Login, you can also click on the “Skip” button.
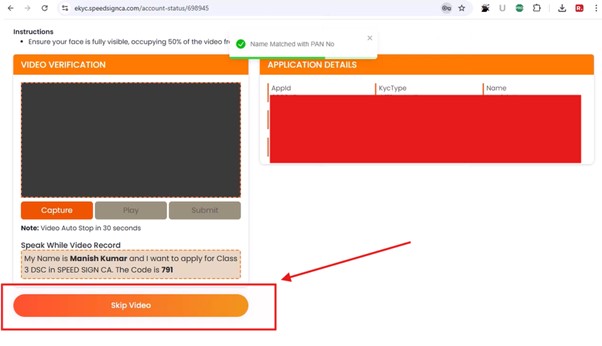
After this step, the payment page for your digital signature will open. You can either make the payment right away or choose the “Pay later” option. Once you complete or skip the payment step, your enrollment process will be complete. Now, after completing the video and payment, you can get your DSC approved and download it directly to your USB token.
Conclusion
Applying for an Aadhaar-based DSC with SpeedSign CA is a modern, hassle-free process. By following these clear steps—from downloading your Aadhaar XML file to completing your video verification—you can get your digital signature quickly and securely. This eKYC method eliminates the need for paperwork, making your entire application smooth and efficient.
Now that you have this complete guide, you can confidently apply for your DSC and begin using it for all your important online transactions.


Add comment